Quickstart#
A collection of small guides to get you going fast with the wrapper, aimed to teach the basics and how to best use the features of this wrapper.
Your first bot#
Let’s build a simple echo bot as a first example:
First of all, let’s be good programmers and let’s setup our main :)
def main():
    pass


if __name__ == "__main__":
    main()
To use the bot, you’ll need an Access Token. To generate an Access Token, you have to talk to @BotFather and follow a few simple steps (described here).
Now that you have a telegram bot token, let’s import what we’ll need: - The bot itself of course - A TextHandler, basically an object that handles text messages from the user - A Prompt, basically a ‘configurable function’ that allow the programmer to send a message.
from MateWrapper.bot import TelegramBot
from MateWrapper.handlers import TextHandler
from MateWrapper.prompts import Prompt


def main():
    pass


if __name__ == "__main__":
    main()
There, now that we have what we need, let’s put everything together. To instance a bot, just create a TelegamBot object:
bot = TelegramBot(token="your bot token", name="your bot name (this is entirely optional)")
then, to add an handler to our newly created bot we just need to call our bots add_handler method and pass in a text handler that itself will call a prompt:
bot.add_handler(TextHandler(Prompt("you said: {_text}")))
With this instruction we are basically telling the bot that, when it receives a text message, it should send a text message containing “you said: {_text}”.
Speaking of Prompts (docs here: prompts module), whenever you put a word between curly
brackets in the text, you are giving the prompt a context directive, these can be of many different types,
in our case we are using a special type of directive exclusive to prompts that will be replace with the
text that the user just sent.
For more info about context directives, see Context directives.
Back to our echo bot, it’s finished! Now all we have to do is start it, which you can with the following instruction:
bot.start_and_idle()
And there you go! We are done! Here’s how your entire bot should look like:
from MateWrapper.bot import TelegramBot
from MateWrapper.handlers import TextHandler
from MateWrapper.prompts import Prompt


def main():
    bot = TelegramBot(token="your bot token", name="your bot name (this is entirely optional)")
    bot.add_handler(TextHandler(Prompt("you said: {_text}")))
    bot.start_and_idle()


if __name__ == "__main__":
    main()
That wasn’t so bad, was it?
Now when you start the bot (assuming the token you used is valid) and write for exaple “hi” to it, it should respond with “you said: hi”.
3 lines of code for an echo bot is pretty good, but keep reading, it gets better ;)
Using Menus#
Now, while Prompts are quite convenient & Building bots that echo what you said or tell you your name/id is pretty cool, where this wrapper gets spicy is with the introduction Menus, Panels & Buttons
For example let’s take a look at tests/choice_sample.py:
from telegram.ext import CommandHandler

from MateWrapper.bot import TelegramBot
from MateWrapper.globals import Globals
from MateWrapper.prompts import Prompt
from MateWrapper.handlers import TextHandler
from MateWrapper.variables import GetText

from MateMenus.buttons import FuncButton, InputButton
from MateMenus.generics import Menu
from MateMenus.panels import Panel


def main():
    bot = TelegramBot("[Your token]", name="test")
    bot.add_handler(Menu(
        entry_points=[CommandHandler("start", Globals.ENTRY_POINT)],
        panels={
            "main": Panel(
                "Hi there {__name}, what do you want to do?",
                [
                    [
                        FuncButton(
                            "show ID",
                            Prompt("Your id is `{__id}`")
                        ),
                        InputButton(
                            "Echo",
                            Prompt("okay, send some text", delete_last_message=True, keyboard=Globals.BACK_KEYBOARD),
                            TextHandler(GetText("text"))
                        )
                    ],
                    FuncButton(
                        "What did i say?",
                        Prompt("You said: '{text}'")
                    ),
                ],
                back_to=Globals.CLOSE_MENU,
            )
        },
        main_panel="main",
        fallbacks=[CommandHandler("end", Globals.END_HANDLER)]
    ))
    bot.add_handler(
        CommandHandler("about", Prompt(
            "Bot made by [SudoOmbro](https://github.com/SudoOmbro)",
            use_markdown=True)
        )
    )
    bot.start_and_idle()


if __name__ == '__main__':
    main()
With 36 (less than 36 actually, most of them are lines with one character) lines of code we built a fully fledged telegram bot that looks like this when started:
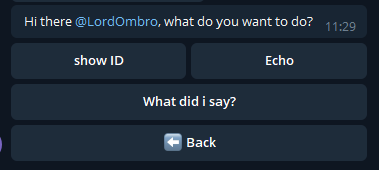
It even has a “/about” command and it can store & print a variable the user inputs! How was it achieved? Let’s look at the various components:
- CommandHandler:
This is just an Handler imported from telegram.ext, note that all base handlers found in telegram.ext are 100% compatible with the wrapper, as they are the base for it’s own implementation of handlers.
This handler will only handle “/command” messages.
- Menu:
This is one of the most important handlers that comes with MATE, it is used for building keyboard based menus in a simple & intuitive way.
It’s basically a wrapper over
telegram.ext.ConversationHandlerthat, instead of having you manually setup conversation states, the handlers tied to each conversation state & callbacks, will automatically generate everything starting from a Dictionary of panels.Why a dictionary? So that the string key assigned to a
Panelbecomes saidPanel’s name that you can reference from other panels, thus creating “Submenus”.Also, what is
Globals.ENTRY_POINT? Well, that is a placeholder function that will be replaced automatically by theMenuat init time with thePromptfrom the Panel set as the main one (this is done by setting themain_panelparameter to the name of thePanelyou want to be the main one), thus letting the user access it when on of theentry_pointshandlers conditions is satisfied.
- Panel:
But what is a Panel? Well, on a purely code based level, it’s just an ordered collection of
Buttonobjects and of extra handlers. On a more conceptual level, you can see a Panel basically as a “view” of the menu, a “submenu” if you will, basically just a Prompt with buttons that do stuff.As you can see from panels module, you can pass a few values when creating a panel, the most important one of these being
buttons, this parameter will determine not only how the panel will look, but also what the buttons will do.buttonsis a list of either buttons or lists of buttons, basically the first level of the list determines the row in which the button(s) will appear, while the second level of list will determine the column of the button. So:buttons = [ [button1, button2], [button3] ]
will appear as:

- FuncButton:
An implementation of the generic
Buttonclass (documented in buttons module) that executes the function passed to it through thefunctionparameter when clicked.
- InputButton:
A special kind of button that will automatically generate it’s state & callback to get an input from the user. In order to support a generic input, an handler (or a list of handlers) with a callback already setup needs to be passed to this button through the input
input_handlersparameter.A
Promptalso needs to be passed to this button; Said prompt will be displayed to the user when awaiting for his/her input.
- GetText:
An implementation of
GetVariableGeneric, this function automatically accesses the latest update from the user and puts the received text in the specified place (either trough a Context directive, documented in Context directives, or acustom setter function).Optionally it can even transform the input through a
transformation function.Other types of getters also exist, see variables module for more info.
Advanced usage#
This section will talk a bit about some of the more advanced features of MATE, for an example that uses most of them refer to The TODO list bot sample
Chains#
Chains are a way of chaining together multiple functions in a single handler, allowing you to create subroutines
that spare you code repetition. They can be put anywhere a callback should go (generally inside an Handler)
and you can even put chains inside other chains!
see Chain in generics module for more info
Custom Panels#
A bare bones implementation of the GenericPanel class that lets you customize
the panel’s prompt in detail and requires you to setup every single handler yourself.
A good example of this Type on panel’s usage can be found in the TODO list sample you
can find reference at the start of this paragraph.
Useful if you want to build an highly custom and dynamic panel inside your menu.
See CustomPanel in panels module for more info.
Decorating Panels#
All panels can be decorated (wrapped by another kind of panel) by using panel decorators; These classes can be used to easily add functionality to an entire panel without repeating yourself.
See panel_decorators module for more info.
Generating keyboards from lists#
Sometimes you need to generate dynamic keyboards from lists of things, since i found it to be a pretty common occurrence i built some helper functions that make doing it pretty easy:
get_keyboard_from_list:lets you generate a keyboard in a pretty standard way, automatically taking care of how the buttons are generated while letting you define a few parameters of the generated keyboard.
get_keyboard_from_list_custom_row:lets you get more “low level” with the keyboard generation, requiring you to pass in a function that will be used to generate a row of the keyboard.
See keyboards module for more info on both functions.